Learn how to view and add documents from a group's page.
TABLE OF CONTENTS
I. Upload Documents
II. Create Folders
III. Add Documents to Group Folder
IV. View Documents
I. Upload Documents
Note: Documents hosted on a group page are visible to the following users:
-
All admins
-
Members added to the group
-
Observers added to the group
The documents section of a group's Group Page is where important documents, specific to this group, can be uploaded for easy access to the entire group. There are five ways a document can be selected for upload:
-
User's computer
-
Document Center (within Boardable)
-
Dropbox
-
Google Drive
-
OneDrive
The first step in uploading documents to a group page is to access the group's Group Page:
-
Access the group's Group Page by clicking Groups from the left main navigation menu and then selecting the desired group
-
Once on the group page, click Documents from the top navigation menu

-
To add a new document, click the + New button to open a menu with the document upload options

From User's Computer
-
Navigate to a group page
-
Click Documents from the top navigation menu
-
Click +New
-
Click Upload a file from the + New button menu

-
The file directory pop-up window will appear (Finder, File Explorer, Launcher, etc. depending on operating system)
-
Navigate to the appropriate directory
-
-
Double click the desired file to add it to the group page or select multiple files and click the Open, Select or Choose button (depending on operating system)
-
To select multiple files that are sequential, click the first file, hold the shift button and then click the last file
-
To select multiple files out of order, click a file, hold down the Ctrl (PC) or cmd (Mac) button and continue to hold until all desired files are selected
-
From the Document Center
- Navigate to a group page
- Click Documents from the top navigation menu
- Click +New
- Click Boardable

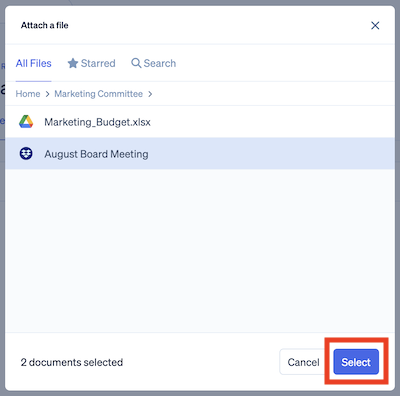
- The Attach a file menu pops up
- Click on a folder to open its contents, or scroll down to find an individual document
- Click on the desired document
- Click Select to add the file(s) to the group page
From Google Drive
-
Navigate to a group page
-
Click Documents from the top navigation menu
-
Click +New
-
Click Google Drive from the + New button menu

-
The Google Drive pop-up window will appear
-
After signing in (if necessary), click Yes to allow Boardable access to the files (if asked - otherwise files cannot be selected)
-
If concerned, these permissions can be revoked after files have been added by doing the following:
-
Sign in to Google Drive from a Browser
-
Go to Settings (gear icon in the upper right corner)
-
Click Manage Apps
-
Click Options next to Boardable
-
Click Disconnect from Drive
-
A pop-up window will appear to confirm, click Disconnect
-
Click Done
-
The files added to Boardable will still be available in Boardable
-
-
-
Navigate to the appropriate folder and file(s)
-
Select the file or files to include
-
To select multiple files that are sequential, click the first file, hold the shift button and then click the last file
-
To select multiple files out of order, click a file, hold down the Ctrl (PC) or cmd (Mac) button and continue to hold until all desired files are selected
-
-
Once file(s) are selected, the Select button will be available
-
Click Select
From Dropbox
-
Navigate to a group page
-
Click Documents from the top navigation menu
-
Click +New
-
Click Dropbox from the + New button menu

-
The Dropbox pop-up window will appear
-
After signing in (if necessary), navigate to the appropriate folder and files
-
-
Click in the box next to the desired file name or files to add a checkmark
-
To select all files within a folder, click the folder to view the contents, then click in the box at the top next to the folder name

-
When viewing a folder, click the minus sign at the top next to the folder name to deselect any files already selected (or click to uncheck the checkmark if all were chosen)

-
-
Once a file is checked, the Choose button will be available
-
Click Choose to add the file(s) to the group page
From OneDrive
-
Navigate to a group page
-
Click Documents from the top navigation menu
-
Click +New
-
Click OneDrive from the + New button menu

-
Select between Copy File and Create a live document
-
To learn about each option, please see Related Articles
-
-
Complete OneDrive login and permissions menu if prompted
-
OneDrive / Sharepoint file directory opens
-
-
Hover over the desired file; circle displays
-
Click this circle to fill it with a checkmark and select it
-
Repeat steps 6-7 until all desired files are selected
-
Click Select
II. Create Group Folders
Note: whole folders cannot be moved from the Document Center to a group page; group page folders must be created.
To make a folder on a group page:
-
Navigate to a group page
-
Click Documents from the top navigation menu
-
Click +New
-
Click New Folder
-
New folder menu pops up
-
-
Type desired title and description
-
Click Save
To create a folder within a group page folder:
-
Navigate to a group page
-
Click Documents from the top navigation menu
-
Click the title of the folder to open it
-
Click +New
-
Click New Folder
-
New folder menu pops up
-
-
Type desired title and description
-
Click Save
III. Add Documents to Group Folders
To add a file to a folder in a group page:
-
Navigate to a group page
-
Click Documents from the top navigation menu
-
Click the title of the folder to open it
-
Click +New

-
Continue as described in From user's computer, From the Document Center, From Google Drive, From Dropbox, or From OneDrive.
IV. View Documents
To view documents from the group page:
- Navigate to the group page
- To learn how to do this, please see Related Articles
- Once on the group page, scroll to the Documents section
- Click on the document name to open the document
Related Articles
-
Documents — Delete from Group Page: learn how to remove documents from the group's page
-
Groups: learn about Boardable groups
-
Group Roles and Permissions: learn about the different types of Group Roles and the permissions associated with them
-
Overview of the Group Page: learn how to view a group's page, understand activity, and view important information