Learn how to edit meeting minutes along with some tips on moving sections, deleting sections, and formatting (i.e. indenting, page breaks)
TABLE OF CONTENTS
I. Edit Meeting Minutes
II. Indent or Outdent a Section
III. Other Formatting Options
IV. Move Location of a Section
V. Delete a Section
I. Edit Meeting Minutes
To edit meeting minutes:
i. From Meeting Page
-
Navigate to the meeting page
-
Click Minutes at the top right of the page

-
Click on Edit Minutes to get started

-
Click the + to get a drop-down menu for additional options
-
To reveal the plus sign
-
Click where it says Start typing... or
-
Click on a section that already exists or
-
Click anywhere at the bottom of the page

-
-
For more information regarding the additional options, please refer to Related Articles
-
-
When finished editing, click the back arrow at the top left of the page - this will gives back the ability for others to make updates

ii. From Boardable Video:
To edit meeting minutes in Boardable Video:
-
Join the Boardable Video conferencing session
-
To learn how to do this, please see Related Articles
-
-
Click the Minutes button (the button showing a pencil on paper) from the meeting content menu on the left side of the call screen

-
Click Edit Minutes
-
Click the + to get a drop-down menu
-
To reveal the plus sign
-
Click where it says Start typing... or
-
Click on a section that already exists or
-
Click anywhere at the bottom of the page
-
-
For more information regarding the additional options, please refer to Related Articles
-
-
When finished editing, click Only you can edit at the top of the page - this will gives back the ability for others to make updates

II. Indent or Outdent a Section
This option is not available for every section - just the outline entries - if unsure, click the section menu (4 dots), when the section is selected, to view the options for that section.
To indent or outdent:
-
Click on the desired section
-
Click on the 4 dots that appear to the left of the section
-
Choose the arrow on the left to indent or the image on the right to outdent

-
There can be up to 2 levels of indent

III. Other Formatting Options
There are several options for formatting the meeting minutes to create a final document that works best for the organization. Here are some useful tips and formatting options.
Note: please refer to Related Articles for more details regarding these and additional options available in meeting minutes, such as recording decisions and votes.
-
Add Header with Meeting Information
-
Click the + for the drop-down menu, then scroll down and click Meeting Info

-
This will add the following:
-
Name of the organization as bolded text
-
Title of the meeting as a larger header
-
Date and time of the meeting in plain text
-
-
If this option was selected and the header added in an undesired location - please refer to Move Location of a Section
-
If the heading sizes or meeting information is not displayed as desired, consider adding headings that can be edited and displayed in various sizes (see Add Headings)
-
-
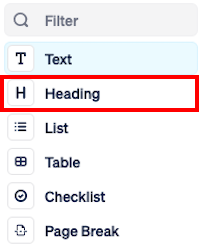
Add Headings
-
Click the + for the drop-down menu, then click Heading
-
Type a heading name and choose the section menu (4 dots) to determine the size of the heading (H1 through H6)
-
If the heading shows blank at first, there may be a refresh issue - close the minutes and re-open them to display and edit the new heading
-
-
-
Add Outline Entry
-
Click the + for the drop-down menu, then scroll down and click Outline Entry

-
This will add an entry that follows the same numbering as previous entries or start at number one if starting from scratch.
-
-
Add Blank Line / Space
-
Click the + for the drop-down menu, then click Text

-
Press the space bar on your keyboard to create a space - this will now create a blank line between the two sections
-
-
Add Page Break
-
Click the + for the drop-down menu, then click Page Break

-
This will result in the following being added to the document, which will create a new page from that spot when the PDF is created

-
Add Headings
-
Click the + for the drop-down menu, then click Heading
Click the + for the drop-down menu, then click Heading
-
Type a heading name and choose the section menu (4 dots) to determine the size of the heading (H1 through H6)
-
If the heading shows blank at first, there may be a refresh issue - close the minutes and re-open them to display and edit the new heading
-
Type a heading name and choose the section menu (4 dots) to determine the size of the heading (H1 through H6)
-
If the heading shows blank at first, there may be a refresh issue - close the minutes and re-open them to display and edit the new heading
If the heading shows blank at first, there may be a refresh issue - close the minutes and re-open them to display and edit the new heading
Add Outline Entry
-
Click the + for the drop-down menu, then scroll down and click Outline Entry
This will add an entry that follows the same numbering as previous entries or start at number one if starting from scratch.
Add Blank Line / Space
-
Click the + for the drop-down menu, then click Text
-
Press the space bar on your keyboard to create a space — this creates blank line between the two sections
Press the space bar on your keyboard to create a space - this will now create a blank line between the two sections
Add Page Break
-
Click the + for the drop-down menu, then click Page Break
-
This will result in the following being added to the document, which will create a new page from that spot when the PDF is created

IV. Move Location of a Section
To move the location of a section:
-
Click on the section to move
-
Click on the section menu (4 dots) that appear in the upper right of the section
-
Click the up or down arrows that appear in the drop-down to move the section up or down within minutes
V. Delete a Section
To delete a section:
-
Click on the section to delete
-
Click the 4 dots that appear to the left of the section
-
Click the X that appears in the drop-down
-
Important Note: all of the information that is highlighted, when the section is selected, will be permanently deleted.

-
-
Click the X again after it turns red to permanently delete the section

Click on the section to delete
Click the 4 dots that appear to the left of the section
Click the X that appears in the drop-down
-
Important Note: all of the information that is highlighted, when the section is selected, will be permanently deleted.
Related Articles
-
Create Meeting Minutes: learn how to create meeting minutes from the meeting page and from Boardable Video
-
Join Boardable Video Conferencing Session: Follow these steps to join a meeting using Boardable Video
-
Attendance in Meeting Minutes: learn how to record and edit detailed attendance, within free-form minutes, during the meeting and after
-
Publish Meeting Minutes: learn how to publish free-form minutes through the meeting page or through Boardable Video
-
Minutes Signatures: learn how to add signatures to minutes